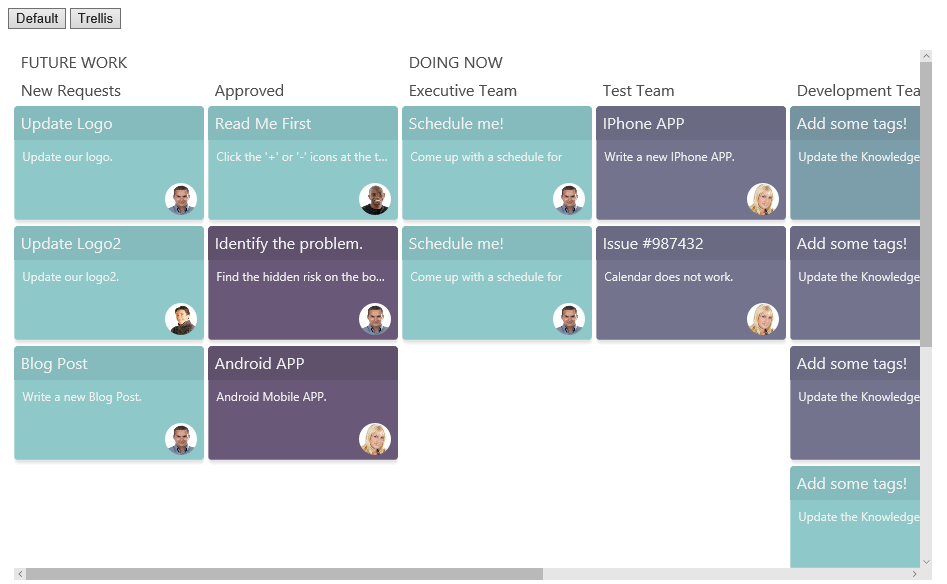
トレリスビューは、グリッド内の一連のセルにデータを配置するグループ化方式です。このビューでは、データを一目で相互比較でき、すべてのデータを系統的に配置できます。ある列のカードを別の列にドラッグすると、グループ、およびその基になるデータ値が修正されます。
トレリスグループは、以下のレイアウトエンジンで使用できます。
- グリッドレイアウトによるトレリスビュー
- カードレイアウトによるトレリスビュー
グリッドレイアウトによるトレリスビュー
このビューは基本的に、垂直のリストとしてグループ化されたグリッドビューです。各行は、水平方向または垂直方向のグループ化方式を使用してレイアウトされます。
グリッドレイアウトによるトレリスグループを実装するには、次の手順を実行します。
サンプルコード
- DataView参照の後に、次の参照を追加します。
<link rel="stylesheet" type="text/css" href="[Your Stylesheet Path]/gc.spread.views.trellisgrouping.10.0.0.css"> <script src="[Your Script Path]/gc.spread.views.trellisgrouping.10.0.0.min.js"></script> <script src="data/timelineBoard.js" type="text/javascript"></script> - bodyタグ内にdivタグを追加して、ページ内のコンテナとしてDOM要素を含めます。
<div style="height: 100%; position: relative">
        <div class="button-container">
            <button id="normal" type="button" class="btn btn-default" onclick="changeToNormalLayout()">Default</button>
            <button id="trellis" type="button" class="btn btn-default active" onclick="changeToTrellisLayout()">Trellis
        </button>
        </div>
        <div style="height:90%;">
            <div id="grid1" style="height:100%;"></div>
        </div>
</div>
rowTemplate定義を追加してから、列を定義します。 ``` var rowTemplate = '
' +'<div class="group-item-container-inner {{? it.progress==100}}finish{{?? it.progress>=80}}eighty-per{{?? it.progress>=50}}fifty-per{{?? it.progress>=30}}thirty-per{{??}}start{{?}}">' + '<div data-column="title" class="group-item-title {{? it.progress==100}}finish-head{{?? it.progress>=80}}eighty-per-head{{?? it.progress>=50}}fifty-per-head{{?? it.progress>=30}}thirty-per-head{{??}}start-head{{?}}"></div>' + '<div data-column="photo" class="group-photo-container"></div>' + '<div data-column="description" class="group-item-description"></div>' + '</div></div>'; var photoPresenter = '<img class="employee-photo" src={{=it.photo}} />'; var columns = [{ id: 'title', name: 'title', dataField: 'title' }, { id: 'description', name: 'description', dataField: 'description' }, { id: 'photo', dataField: 'photo', presenter: photoPresenter }, { id: 'progress', dataField: 'progress' }];var TrellisGrouping = new GC.Spread.Views.Plugins.TrellisGrouping({ panelUnitWidth: 190 });4. DIVタグのグリッドIDを呼び出し、コードを初期化します。var dataView = new GC.Spread.Views.DataView(document.getElementById('grid1'), data, columns, new GC.Spread.Views.Plugins.GridLayout({ grouping: [{ field: 'work', header: { height: 24 } }, { field: 'category', header: { height: 24 } }], rowTemplate: rowTemplate, rowHeight: 120, groupStrategy: TrellisGrouping }));5. デフォルトビューとトレリスビューを切り替える関数を追加します。function changeToNormalLayout() { $('#normal').addClass('active'); $('#trellis').removeClass('active'); dataView.data.groupDescriptors = null; var options = dataView.options; options.groupStrategy = null; options.rowHeight = 40; options.rowTemplate = null; dataView.invalidate(); } function changeToTrellisLayout() { $('#normal').removeClass('active'); $('#trellis').addClass('active'); dataView.data.groupDescriptors = [{ field: 'work', header: { height: 24 } }, { field: 'category', header: { height: 24 } }]; var options = dataView.options; options.groupStrategy = TrellisGrouping; options.rowHeight = 120; options.rowTemplate = rowTemplate; dataView.invalidate(); }## カードレイアウトによるトレリス このグループ化方式では、個々の行を、同じ高さと幅を持つ1つのカードアイテムとみなします。このビューは基本的に、グループ化されたカードレイアウトです。ユーザーはドラッグアンドドロップを使用して、グループを並び替えることができます。次の例では、カテゴリ別にグループ化したカードリストを表示します。 カードレイアウトによるトレリスグループを実装するには、次の手順を実行します。  ### サンプルコード 1. DataView参照の後に、次の参照を追加します。<link rel="stylesheet" type="text/css" href="./css/bootstrap-snippet.min.css"> <link rel="stylesheet" type="text/css" href="./css/gc.spread.views.cardlayout.10.0.0.css"> <link rel="stylesheet" type="text/css" href="./css/gc.spread.views.trellisgrouping.10.0.0.css"> <script src="scripts/gc.spread.views.cardlayout.10.0.0.min.js" type="text/JavaScript"></script> <script src="scripts/gc.spread.views.trellisgrouping.10.0.0.min.js" type="text/JavaScript"></script> <script src="data/flashcard.js" type="text/javascript"></script>2. **body**タグ内に**div**タグを追加して、ページ内のコンテナとしてDOM要素を含めます。<div style="height: 100%; position: relative"> <div class="button-container"> <button id="normal" type="button" class="btn btn-default" onclick="changeToNormalLayout()">Default</button> <button id="trellis" type="button" class="btn btn-default active" onclick="changeToTrellisLayout()">Trellis </button> </div> <div style="height:85%;"> <div id="grid1" style="height:100%;"></div> </div> </div>3. rowTemplate定義を追加してから、列を定義します。var rowTemplate = '<div class="group-item-container">' + '<div class="image-container" data-column="image"></div>' + '<div class="name-container" data-column="name"></div>' + '{{?it.currentCategory===it.category}}<div class="correct-container"><div class="correct-mark"></div></div>{{?}}' + '</div>'; var imagePresenter = '<img class="flash-image" src={{=it.image}} />'; var columns = [{ id: 'image', dataField: 'image', presenter: imagePresenter }, { id: 'name', dataField: 'name' }]; var groups = ['animal', 'weather', 'emotion', 'shape']; data.forEach(function(item) { item.currentCategory = getRandCategory(item.category, groups); }); var TrellisGrouping = new GC.Spread.Views.Plugins.TrellisGrouping({ panelUnitWidth: 300, gapSize: 6 });4. DIVタグのグリッドIDを呼び出し、コードを初期化します。var dataView = new GC.Spread.Views.DataView(document.getElementById('grid1'), data, columns, new GC.Spread.Views.Plugins.CardLayout({ cardHeight: 160, cardWidth: 150, grouping: [{ field: 'currentCategory', preDefinedGroups: groups, header: { height: 40 } }], groupStrategy: TrellisGrouping, rowTemplate: rowTemplate }));5. デフォルトビューとトレリスビューを切り替える関数を追加します。function getRandCategory(correctCategory, groups) { return groups[Math.floor(Math.random() * 8)] || correctCategory; } function changeToNormalLayout() { $('#normal').addClass('active'); $('#trellis').removeClass('active'); var options = dataView.options; options.groupStrategy = null; dataView.invalidate(); } function changeToTrellisLayout() { $('#normal').removeClass('active'); $('#trellis').addClass('active'); var options = dataView.options; options.groupStrategy = TrellisGrouping; dataView.invalidate(); }```